
After years of practice, I perfected my wire-wrapping technique so that it is attractive and sturdy. If I had seen a tutorial like this in the beginning, I may have avoided all the ruined snippets of wire on my desk, so I thought this might come in handy for anyone who would like to learn a new jewelry trick. Follow along with these step-by-step instructions and I'll teach you how to make wire-wrapped charms that will never come undone. Here's what you'll need to complete this project:
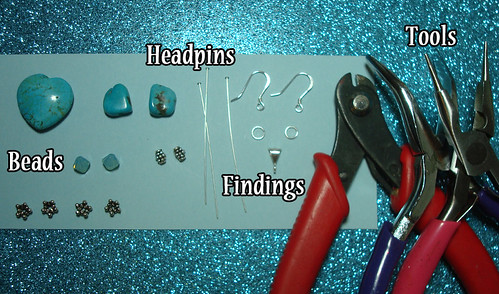
★Headpins- You can find these at any craft supply store. They look like sticks of wire with a flat piece of metal at the end for holding beads in place. The thinner the wire, the easier they will be to work with.
★Jewelry Findings- Which findings you need will depend on what you intend to make. If you want earrings, you'll need earwires. If you'd like to make a pendant, you will need a bail or a jump ring.
★Tools- The essential tools for this project are wire cutters, flat nose pliers (mine are ergonomic bent pliers, which is helpful when it comes to wire-wrapping), and round nose pliers.

2. Place your round nose pliers about 5 mm above the top bead and bend the wire to a 90° angle.
3. Use your finger to wrap the wire over the top of the pliers to begin forming a loop.
4. Reposition your round nose pliers so that you are gripping the partial loop as seen in image 4.
5. Grasp the tail of the wire with the flat nose pliers and bring it across the front, completing the loop.
6. Now that your loop has been formed, you can remove the round nose pliers and grasp the loop with your flat nose pliers. Grasp the tail of the wire with another set of pliers. Pliers with a mild tread inside the nose work great for gripping the wire, but any kind will work. Don't worry if the end of your wire gets bent or marked by the pliers, because you will be trimming this part anyway.
7-8. While firmly holding the loop with the flat pliers, wrap the wire tail around the headpin at least two times.
9. Once you've created the desired amount of coils and your wire is running out, trim the excess so that the end is on the back of your work.
10. Use your flat nose pliers to press the tail down into the coil, squeezing tightly to avoid any sharp edges.
11. Use your round nose pliers to straighten out your loop if it became bent or misshapen during the wire-wrapping process.
12. Repeat these steps to create additional charms for earrings and pendants.
13. Attach the appropriate findings to complete your jewelry pieces. Enjoy your brand new jewelry that will last a lifetime!

7 comments:
Great tutorial
Happy New Year to you and yours!!!
Love this tutorial! I started wire wrapping about a year ago, and I really love it. I may not be very good at it, but it's really fun.
Firstly, Happy New Year, Holly!!
And second, what a super useful tutorial!
happy new year!!!!!!
Hi Holly, Haven't commented for a while, so I thot I'd say your tutorial is just what I needed ! I've been futzin' with the beads here lately too.
Sue
wow this DIY is awesome!
http://coeursdefoxes.blogspot.com/
Post a Comment