
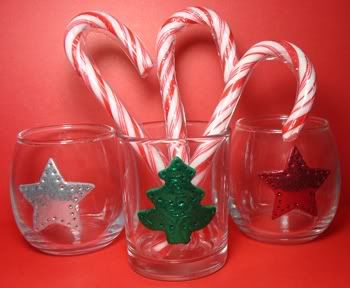
Cookie-Cutter Candle Holders
Here are the materials you will need. You may have some of them laying around your house, and anything you don't already have may be purchased for next to nothing at craft supply stores. Another perk is that this project is easy to adapt, which is why I'll show you different changes you may wish to make along the way.
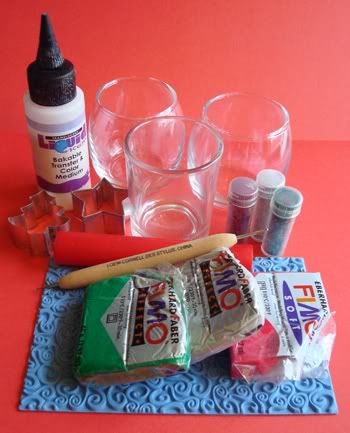
Supplies (starting at the top left and moving clockwise around the photo):
~Liquid Sculpey Bakable Transfer & Color Medium- since this item is the most expensive of the supplies (about $6-$8) and you might not have it on hand, I will show you how to do this project without it too.
~Glass candle holders. These may be purchased for as little as 50 cents, but you may also use recycled glass containers such as baby food jars.
~Glitter in colors of your choosing (I used red, silver, and green).
~Polymer clay in colors that match your glitter.
~Rubber stamps or texture sheets. You may also use lace, screen, sandpaper, or nothing at all. It's all about what kind of texture you prefer, if any.
~Tools. Mine are designed for polymer clay, but yours don't have to be. You need something to roll the clay with (like a rolling pin or a small bottle) and something you can use to poke little dots on your clay (such as a pin or wire).
~Cookie-cutters. I prefer the mini-cutters that are available in the baking section of craft supply stores since they work perfectly for polymer clay and they only cost about 75 cents each. It might be best to dedicate these to crafting purposes, because the clay may get stuck in the tiny parts of the cutters and you wouldn't want to use them for food preparation afterward (although polymer clay is non-toxic, so you will probably be okay if you thoroughly wash them when you're done).
STEP 1: Prepare a clean work surface to keep the clay from getting dirty. If you have wax paper, tear off a sheet and tape it to your surface.
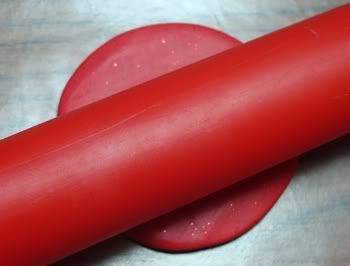
STEP 2: Take a chunk of clay from your package. Warm it in your hands and shape it like a ball, then press the ball onto the wax paper. Flatten it with a roller until your clay is spread into a flat, smooth sheet.
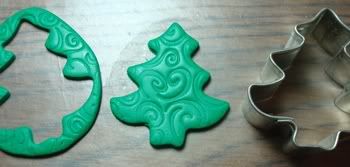
STEP 3: Use your cookie-cutters to cut a shape from the center of the clay.

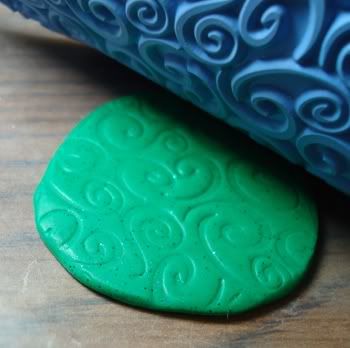
STEP 4: If you would like to add texture to any of your images, do so BEFORE cutting the shape. Press the textured surface onto the clay and slowly remove. Then, proceed to cut the shape.
STEP 5: Once you have finished making the shapes, apply glitter. Rub it into the clay with your finger until the entire shape is covered. If you are working with multiple colors of glitter, you will need to wipe your workspace clean before moving on to the next color to keep from mixing them. This point in the project would be a good time to preheat your oven to 250-275 degrees Fahrenheit, depending on the brand of clay you're using. You will find specific baking instructions on the package.

STEP 6: If you have liquid clay, apply TINY drops of it to the glass. If you add too much, it will squirt from the sides when your press on your shape. The drops will need to form a vague outline of the shape you'll be applying. For example, I put one drop in the center and a drop for each point of the star.

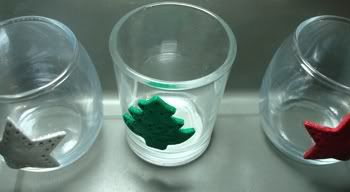
STEP 7: Press your shape onto the glass, lining it up with the drops you applied. Don't press so hard that you distort your shape, but press hard enough that it is firmly stuck to the glass. *Alternate method- if you DO NOT have liquid clay, skip step 6 and just press your shape directly onto the glass.
STEP 8: After the shape has been pressed onto the glass, use your pointy tool to poke little holes in the clay. Poke all the way through to the glass, but do so carefully so that the shape stays intact. You may choose whatever pattern you desire. For example, I poked holes around the perimeter of the stars.

STEP 9: Is your oven done preheating? If so, place your candle holders in an oven-safe dish and bake them. I baked mine at 275 degrees for 17.5 minutes, but the exact baking directions will be detailed on your package of clay.
STEP 10: When the timer goes off, carefully remove the dish from the oven. Allow your candle holders to sit for at least 10 minutes before proceeding. Once they are cooled, wipe off any excess glitter on the surface of the glass using a dry paper towel. If you did not use liquid clay to adhere your shapes to the glass, they might fall off once the candle holders cool. If this happens, simply glue them back on using something like Superglue or E6000, both of which will stick to glass.
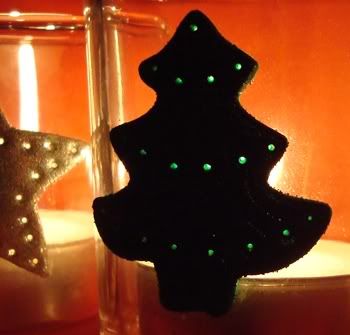
STEP 11: This is the best part! Light a candle inside your new holder. Remember those holes you poked into the uncured clay? The light will twinkle through them!
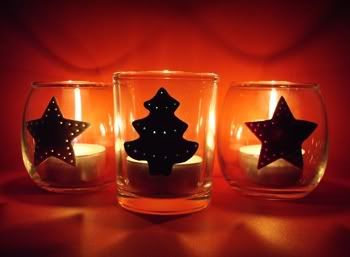
Pretty cool, right?
As long as you've got an adult to operate the oven, this would be a great project to do with kids. These candle holders would also make nice gifts for those of us who enjoy decorating our homes with festive things during the holidays. Enjoy!
24 comments:
Really cute idea, sweet!
OXO
Christina
love love love these all lit up with candles!
Those are really pretty!
I have some clay that's been waiting around for me to use up. Maybe this is a prject for me and a cute little 5 year old!
http://christiecottage.blogspot.com
Great quick project and, at this point in time, quick is the operative word! You've done a great job of walking everybody through the process, too.
Great tutorial and a cute project!
Now I want to make some! I had no idea my dormant interest in polymer clay would ever be reignited, but you're such a good teacher.
This is genius...I LOVE it! Great idea!
those are so cute! i love how the light shines through. i didn't know that you could just rub the glitter onto clay. i may have to try that sometime! for like your glittery pendants, what do you use to seal them? just the sculpey glaze or what?
That's such a cute idea! Love it!
I love that texturizing thingie! I have an idea for a wreath filled with cookies, but didn't want to get bugs :( But, this might be the perfect alternative!
This is an excellent tutorial, Holly. Your talent for your craft, photo skills, writing, teaching, and web knowledge really show in this. You're a perfect candidate to write a book, I think it would do well!
Those are cute! Wow... I really have to get onto my gift crafting soon.... time is running out! I will have to put this on my list of craft gift ideas! :)
Dude, ADORABLE. I love your magic crafts.
And thanks for the reading out loud thing. It makes me feel totally special.
Aww! Thanks so much for the super cute tutorial! I'll have to try this out with Devon, she'll love it:)
SUCH a cute project!
Thanks for giving us a tutorial! I also love making things with clay, but I have seem to lost my bag that I kept my clay in. When I DID have my bag of clay, I had some of the same clay that you were showing. I will come back and read this once I buy some or find my clay. hee hee :)
Those are beautiful! You are one crafty chica!!
What a lovely idea Holly! I havent worked with polymer clay before, but im always admiring others creations.
I can't wait to see what other holiday goodies you come up with :)
Rose
These are SO cute! What a great holiday creation. PS....best of luck on your upcoming trip to Eureka!!! :D take lots of pictures!~!
SUCH a cute idea! Thank you so much!!
I used to work with clay, and I refuse to get rid of what I have left, but I'm always looking for something fun to do with it too, so this is perfect. ;)
♥ Janell
Oh my, you are so creative, Holly! Super love the cups when they are lit up.. beautiful! Now I can see why you're meant to teach children art and crafts..you're certainly gifted in this area! :)
Rheea
Very clever! I didn't know you could glitter-fy that stuff either, and I have some here to play with. Cool.
That's so cool!! :)
Looks like a lot of fun too.
i do lovey your tutorial
i want to try it :)
Post a Comment