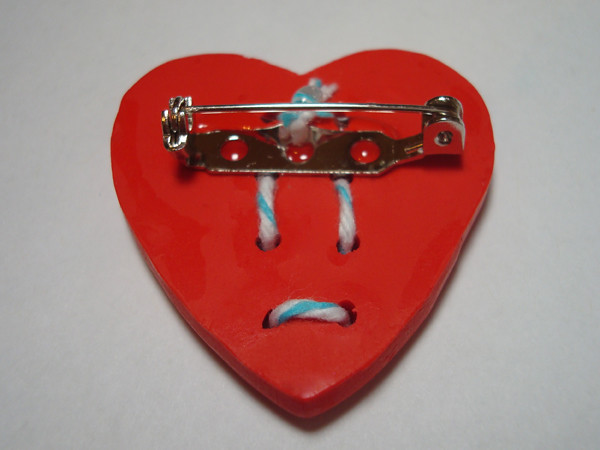
Monday, December 28, 2015

Literary Art

Hello, my sweet little lonely blog.  Let's get back in touch by recapping some of my favorite reads this year, all of which are part of an ongoing art project I've become obsessed with.

In May of 2015, I had just finished reading 11/22/63 by Stephen King and couldn't get it off of my mind.  I'd been wanting to experiment with watercolors, and had just received a new set of pearly paints in the mail.  I grabbed a watercolor journal I had bought on sale for a few bucks and painted one of my favorite quotes from the book on the first page.  

I didn't realize I was starting a tradition.  To be honest, I don't find the first page particularly beautiful.  All I really intended to do was play around with some new art supplies, but it turned out to be quite enjoyable.  I continued the practice with other books as I finished them, and dedicated my watercolor journal solely to this purpose.  Throughout the rest of the year, I ended up completing over 20 books and painted quotes.  Here are a dozen of my favorites. 
The great thing about this little experiment is that it's just for fun.  I'm simply documenting the books I read in a light-hearted, creative way.  As an added bonus, this practice gently hammers the moral of each story into my brain and I find it very meditative.  My reading tastes are extremely varied, but the common thread is that I now look forward to reflecting on each book while creating informal art as I make my way through my reading list.  

I'm hoping to collect a whole new batch of amazing books and memorable quotes in the coming year. What kind of creative projects will you attempt in 2016?

Saturday, September 5, 2015

My Attempt at Plarn

That's right, you read it correctly.  I said plarn.  If you've never heard this word before, "plarn" means plastic yarn, made from strips of plastic bags.  Do a quick web search to discover a plethora of amazing things you can make from this fun (and free!) craft material.  Pinterest alone has enough projects to keep your creative gears going for years.  I recently decided to try my hand at making a plarn basket to keep on my kitchen table, and I found this project to be incredibly fun and addictive.  You'll never look at plastic bags the same once you've used them as a readily accessible craft supply.

Plarn (Plastic Yarn) Basket

This tutorial requires a basic understanding of crochet techniques, and I wouldn't recommend it as your very first crochet project because the knots in the yarn and the bulky stitches could be a little tricky for a brand-new crocheter.  But once you practice a bit with regular yarn to get a feel for the motion and structure of crochet stitches, it's pretty easy!  I came up with my own pattern to create a medium-sized basket, but a search for "plarn" will reveal an abundance of other patterns and ideas.

Making Plarn

1. Gather a stack of plastic bags and a sharp pair of scissors (and a crochet hook if you plan to make a basket like mine).
2. Lay a plastic bag flat and cut off the bottom seam and the handles.
3. Carefully fold the bag in half over and over again until you have a thin tube shape.
4. Cut the bag into slices measuring about an inch wide.
5-8. When you unfold the slices, each one will create a loop shape.  Tie the loops together as seen in the photos below and pull tight.
9. As you create the plarn, wind it into a ball or use a piece of cardboard as a spool.
10. Once you have enough yardage for your desired project, take out your crochet hook and transform your plarn into something new.  Color changes can be achieved by simply tying in a new color at the end of a length of plarn.  

Plarn (Plastic Yarn) Basket Tutorial

Crocheted Plarn Basket

You will need:
• 10-15 plastic plastic bags (I used 10 white plastic grocery bags and 2 dark blue Gap bags)
• Size J crochet hook
• Scissors

The following is a pattern for a medium-sized basket written in standard American crochet terms.  Here's a guide to the abbreviations used: 
ch= chain
sc= single crochet
st(s)= stitch, stitches
*...*= repeat the sequence shown within the asterisks
slst= slip stitch
Note: The bottom rounds are worked continuously, do not join rounds with a slst until instructed to do so when you begin working on the sides.  Use a stitch marker (such as a hairpin or a piece of string) to keep track of your rows.

1. Ch 2; 4 sc in 2nd ch from hook.
2. 2 sc in ea sc around. (8 sts)
3. 2 sc in ea sc around. (16 sts)
4. 2 sc in 1st sc, *1 sc in next sc, 2 sc in next sc* repeat 6 times, 1 sc in last sc. (24 sts)
5. 1 sc in 1st sc, *2 sc in next sc, 1 sc in ea next 2 sc* repeat 6 times, 2 sc in next sc, 1 sc in last sc. (32 sts) 6. 2 sc in 1st sc, *1 sc in ea next 3 sc, 2 sc in next sc* repeat 6 times, 1 sc in ea last 3 sc, join with slst. (40 sts)
7. 2 sc in 1st sc, *1 sc in ea next 4 sc, 2 sc in next sc* repeat 6 times, 1 sc in ea last 3 sc, join with slst. (48 sts)
8. Ch 1, sc in ea sc around, join with slst.
9. Repeat row 8 until your basket reaches the desired height. If you'd like to add a colored rim, simply tie a new color of plarn at the end of the strand and keep working.
10. Tie off and weave in ends.

You will be amazed at how sturdy the finished product is!  In fact, one of my favorite things about the concept of using plastic bags for yarn is that the very characteristic of plastic that makes it so harmful for the environment, its slow decomposition rate, can be used to your advantage for creating durable, useful items such as tote bags, sandals, and rugs.  So grab a handful of plastic bags and let your awesome, earth-loving imagination run wild!

Saturday, July 25, 2015

Go Take a Hike

I may be a little behind the hype on this one, since the book was published in 2012 and the film has already been released on DVD, but I recently read Wild by Cheryl Strayed and found it deeply moving so I want to share my review in case it catches the eye of anyone who is on the fence about it.  In my opinion, all the publicity surrounding this book is well deserved
As a reader, I appreciated that Cheryl Strayed seemed very honest.  She did not paint a portrait of herself as some trail goddess, effortlessly stomping past the nay-sayers.  Instead, she allowed an intimate and unashamed glimpse into her mishaps on the trail as well as her past, choosing not to exclude her failures.  The book bounces back and forth in time, between the author's family history and coming of age to her epic quest on the the Pacific Crest Trail.  This format made for a quick plot and a nice mixture of adventure and backstory.

\

The plot gathered so much momentum that I started the book in audio format and had to switch midway through because I wanted to soak up the details faster than the narrator was giving them to me.  With the book in my hands, I tore through the pages to see if Strayed would make it to the "finish line" before having her will shattered by the various obstacles she encountered during her trek.  The hike easily materialized in my imagination with detailed descriptions of the ways she dealt with the loneliness of the trail, singing folk songs aloud during the day and clinging to the comfort of books in the evenings.  


I watched the movie shortly after completing the book, and I loved the experience of seeing the whole story come to life without being butchered by Hollywood.  The soundtrack is fantastic, and Nick Hornby did a superb job writing a screenplay that stayed fairly true to the book.  I will not soon forget this unflinching portrayal of one woman's rock-bottom and her inspiring quest to reshape her life.

Saturday, March 14, 2015

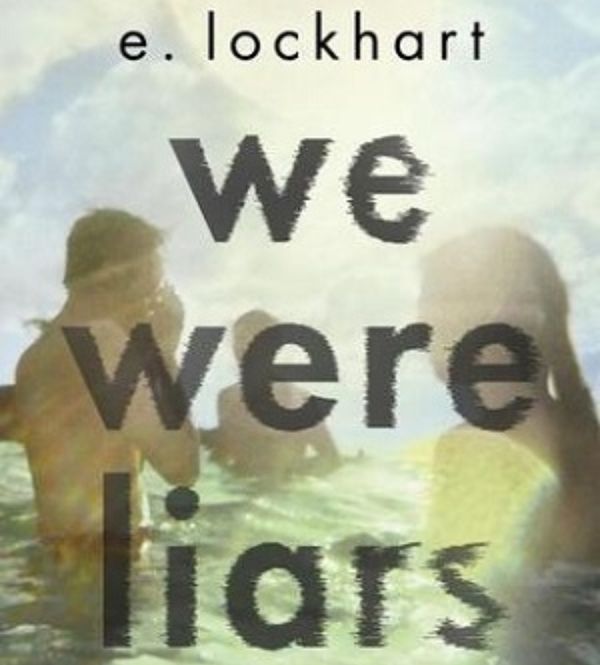
We Were Liars

Just yesterday, I finished a book that completely swept me away.  I'm having a hard time getting it out of my head, and of course that may be because I'm in that dream-like haze one often encounters in the wake of a really good book.  But I can tell that even after the initial excitement wears off, this will be a story I'll carry with me.  I get so excited when I find a book like that, so I wanted to share this one because, judging by the buzz, I'm certain there are many readers out there who would find it as moving and engaging as I did.

We Were Liars by E. Lockhart


I was absolutely captivated by this book, from beginning to end. The pages of the story were sprinkled with quote-worthy lines, and kept me completely engaged. Although this is a YA book, it has such a wide appeal that it could easily find its way into the favorites of adult readers. With characters who feel like your own dysfunctional family and a plot that makes you anxious for answers, this was a thoroughly enjoyable read that I'm so glad I picked up.

I'll leave you with two of my favorite quotes from the book.


Have a great weekend!  Whether it's this particular title or not, I hope you find the time to relax with a good book.

Tuesday, November 11, 2014

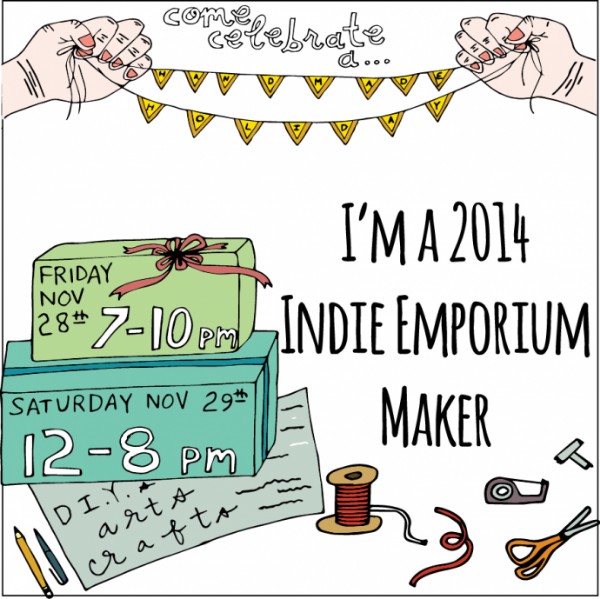
Indie Emporium is Coming!

Good afternoon, friends!  I mentioned in my recent terrarium tutorial post that I took on a new position at work earlier this year.  I really feel like I'm in my element now, and I've become married to my work so to speak.  That being said, I decided it was important to participate in at least one craft show this year despite this newly increased workload.  If you've ever witnessed my excitement about Indie Emporium in past years, you might have guessed that even if I reduce the amount of craft shows I take on to one a year, THIS will be the one!

So rather than neglecting my blog and focusing 100% of my passions into my day job, I'm shining some light onto the crafty side of life by giving a you a little tour of what I have in store for this year's Indie Emporium!  Let's start with the swag.  Every year, there are swag bags consisting of samples and small gifts given to the first 50 people in line at the opening of the show Friday night.  The line gets longer each year since many of the vendors contribute to these bags, making them a treasure trove of fun things to browse (it is not uncommon to see the lucky recipients hovering in corners tearing into theirs, unable to overcome the suspense of wondering what's inside).  I've included things like guitar pick keychains, glow-in-the-dark magnets, herbal tea, buttons, and charms in the past, and I try to add something fun and fresh each year.  This time around I put together little sticker packs, each containing three upbeat sentiments.


Last year, I almost completely sold out of the craft kits I brought.  So this year, I'll be equipped with a huge stock of dream catcher kits and these fun sewing kits, which contain all the supplies and instructions for making your own little wallet.  I'll have plenty of bright new color combinations, too!


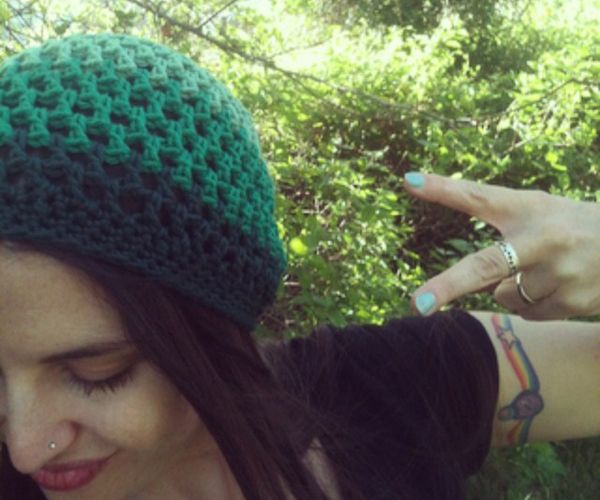
I also premiered my Slightly Slouchy Beanies last year to a pretty warm welcome, which made me happy because I came up with a pattern and tampered with it ceaselessly until I found what I believe to be the perfect fit.  I replenished my stock of solid colors for the 2014 show, and I whipped up some fun gradient style hats as well.


This idea came from a hat I made for myself in shades of green.  The shifting colors make it an easy accessory to fit into my wardrobe (in the photo above, I was acting goofy and wearing my gradient green beanie with a black tee and bright green corduroy pants).  Mine was getting a lot of use, and receiving some compliments too, so I came up with a variety of color combos to bring to the show.


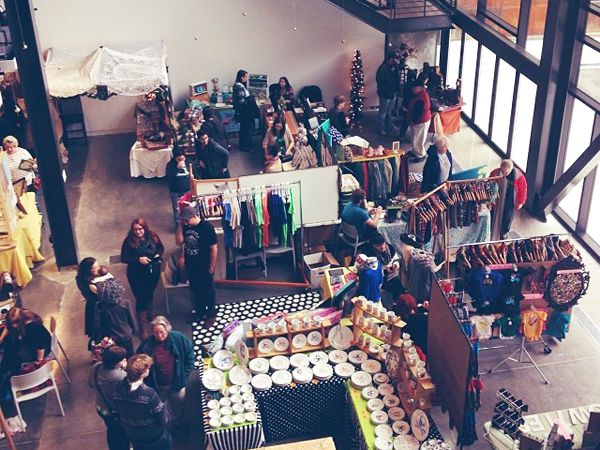
Up next on the agenda, I'll be sculpting up some new creatures and a fresh batch of glitter acorn necklaces.  If you're in the Tulsa area and you've ever attended this show, you know what a blast it is and I hope you'll come back.  And for those who are close by but have never attended, you have GOT to experience this event!

Photo courtesy of Mandy Gross
There will be all kinds of fun, crafty things to do while you browse this impressive roster of makers.  I hope to see you in a few weeks at Indie Emporium 2014!

Saturday, August 16, 2014

Crochet Projects for Beginners

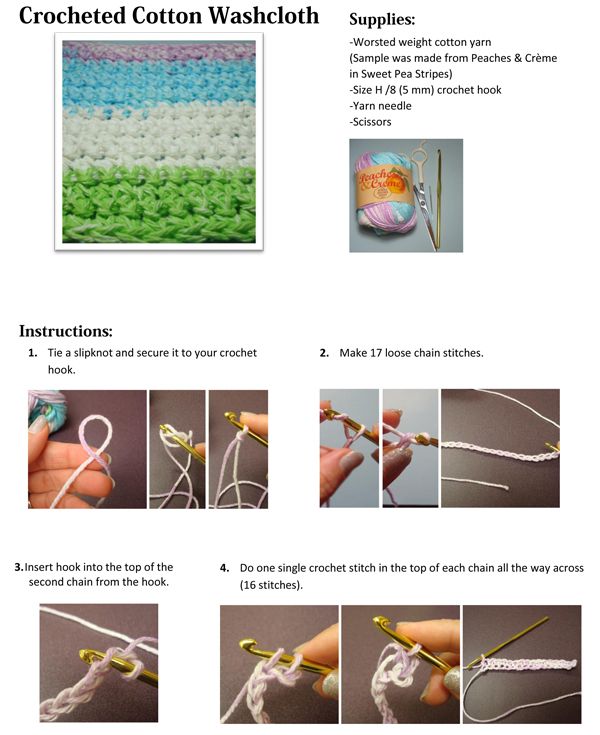
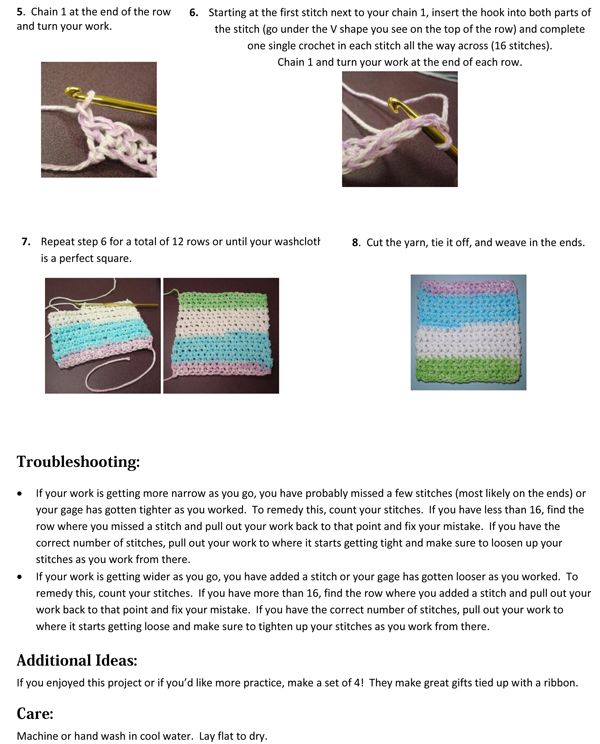
Hello there, crafty friends and creative souls!  In an attempt to help spread the art of crochet with young learners, I've been putting together a few very basic crochet projects designed with the absolute beginner in mind.  While my intention is to use these projects at the library to work with local teens on broadening their crafty skills, I also decided to share them with those of you out there in the world who either A) would like to learn and practice crochet, or B) already know how, but enjoy quick and easy project ideas.  

So this is the first and easiest of the two projects, and you can anticipate the other one very soon.  Today, I'm showing you how to make crocheted cotton washcloths (find the printable PDF version here).  I feel the need to emphasize how fast and easy these are to make.  An experienced crocheter can finish one in 15 minutes easily!  They work as washcloths, dish cloths, or even gifts- especially if you make a set of 4 and package them with some nice soap.  Grab your hook and let's get started!


You can finder a larger, printable copy of this tutorial here.  Feel free to share it with any budding crochet artists you might know.  Happy crafting!

Friday, July 4, 2014

The Craft Connection + Terrarium Tutorial

Hello and happy 4th of July!  I'm here to teach you one of my absolute favorite projects and share some exciting news for teens in Tulsa.  Since creativity is the language I speak, I'm starting a new craft group where Tulsa youth can share ideas and show off their work.  It will be called The Craft Connection, starting August 4th and continuing the first Monday of each month.


For the very first installment of The Craft Connection, we'll be making terrariums!  There is something magical about creating your own little world under glass, and there are so many ways you can personalize these tiny landscapes.  I'll give you the basic recipe for how to build the perfect terrarium, and your imagination can take you from there!

Make Your Own Terrarium

You will need:
- A glass jar, vase, or bowl
- Soil
- Gravel
- Activated charcoal
- Plants or moss
- Rocks, crystals, garden stakes, or other decorations
- Skewers
- Paper towels
- Spray bottle

Assembly: 
1. Gather your supplies and make sure the glass jar is clean and dry.
2. Pour a layer of gravel into the bottom of the jar for drainage.
3. Sprinkle a pinch of activated charcoal onto the top of the gravel layer to prevent rot.
4. Add a layer of soil deep enough to accommodate the plants you’ll be using. Also make sure the soil is appropriate for the plants you have.
5. Now add the plants! If you are using moss, make sure to remove any excess dirt and simply lay a sheet of moss on top of the dirt. If you are using rooted plants, you will need a deeper dirt layer. Shake any loose dirt from the roots, then gently dig a hole and place the plant inside.
6. Fill in the dirt around the plant to secure its place in the terrarium. Add additional plants as space allows.
7. Place a few stones, figurines, or garden stakes in your terrarium for a decorative touch.
8. Use a paper towel to wipe dirt from the sides of the terrarium. Lightly mist the terrarium with a spray bottle to allow everything to settle.


Care Instructions: 
1. Place your terrarium in an area with indirect sunlight. Too much light will burn your plants, so find a spot near, but not right next to, a window.
2. Lightly mist your terrarium with a spray bottle once a week at the very most. Reduce the watering to once every two weeks or even once a month in the winter.
3. Lids should not be used on terrariums containing succulents because it creates too much humidity. For other plants, lids may be used but should be removed for a few hours once a week to allow the terrarium to air out.
4. Rotate the terrarium every few weeks to allow equal light in all parts.

Video Tutorial:
My friends at KTUL were nice enough to help me promote this fun tutorial on Good Day Tulsa.  You can view this project in action by watching this video.


Additional Resources:
For a thorough list of plants that will work in a terrarium, visit this site.

I want to encourage all my Oklahoma friends to send any creative teens my way starting in August at the Schusterman-Benson Library.  Have a happy summer!

Thursday, May 1, 2014

Crochet Milestone #2- My First Garment

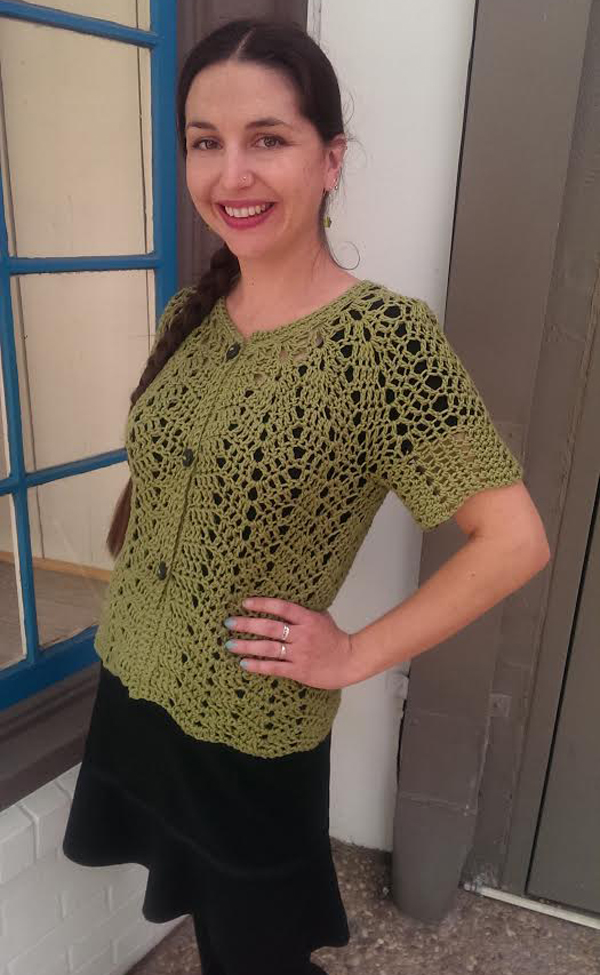
You may recall the first crochet milestone I felt the need to brag about, the blanket I made for my newborn nephew.  Crocheting an afghan is something that requires a lot of time, but I didn't even follow a pattern because I had a vision in my head of a simple design I knew I'd be able to implement.  Clothing, however, has intimidated me for quite some time.  Even the most simple garment patterns seemed very complicated to me and I had never been able to work up the confidence to attempt one until recently.

My favorite local yarn store, Loops, has been hosting a cardi party which took place over the past few weeks and comes to a close today.  They pair up plenty of fun projects with beautiful yarns and offer prizes and encouragement to anyone who starts a cardigan during this promotion.  It was just the motivation I needed to finally attempt the Chevron Lace Cardigan I've been eyeballing for so long.  I used Berroco Modern Cotton for a sweater that is satiny soft and lightweight enough to wear in the warmer months.  And after all that anxiety about making a garment, I finished it!  Successfully!

Chevron Lace Cardigan

Other than a bit of confusion on the sleeves, it wasn't even very difficult!  So in classic Holly style, I made myself think I wasn't capable of something that turned out to be completely doable.  I would say something along the lines of "Lesson learned!  The next time I question my abilities, I'll shake those negative feelings and take on the challenge with the confidence of an ego-fueled rock star."  But realistically, we all deal with self-doubt and I'm sure it will creep into my mind with the next goal I set for myself.  It always does, if only for a brief, nagging moment.  Hopefully, though, the little bursts of confidence that come with each small win will serve as reminders to never get too comfortable.  To keep learning and growing and building.  So there you have it, a little crochet analogy for the fact that we're all better than we think we are.  Stay awesome and have a great week!

Tuesday, April 22, 2014

World Book Night 2014

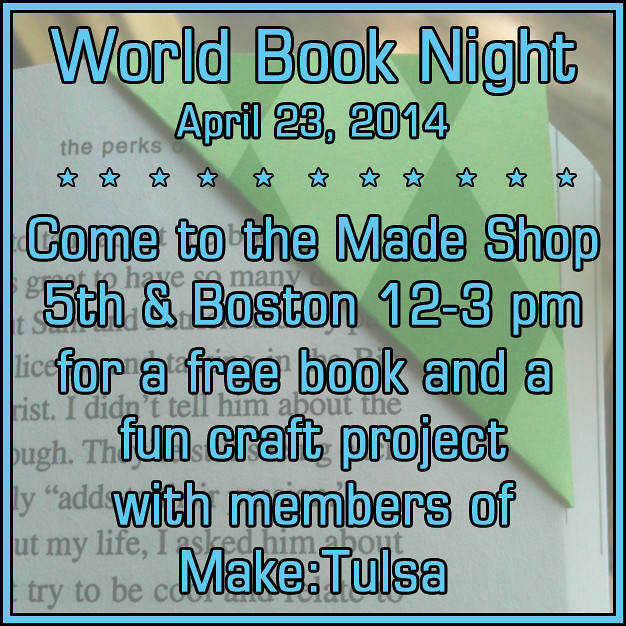
Did you know there is a very special day in our midst?  World Book Night is taking place on Wednesday, April 23rd, and thousands of people all over the globe have volunteered to be givers of brand new, special edition books- including yours truly! 

World Book Night!

The book I am giving is The Perks of Being a Wallflower by Stephen Chbosky, and if you're in the Tulsa area and you'd like to lay claim to a copy of this awesome read, you can find me in the lobby of Made: The Indie Emporium Shop Wednesday, April 23rd (tomorrow!) from noon to 3 with a stack of 20 books while they last.  I'll be set up with a fellow member of Make:Tulsa, the lovely Sam of Bohemian Romance fame, passing out books and making the origami bookmarks from this tutorial I posted previously on my blog.

The mission behind World Book Night is to get shiny new copies of popular books into the hands of people who don't regularly take the time to read, with the hope that some of these book-reader connections will spark a lifelong love of reading.  Every year, an application process begins and most of the people who express an interest in this cause are approved.  If you think you might enjoy the opportunity to pass out free books to strangers, I encourage you to visit the WBN website for more information on becoming a giver.  Happy reading!

Sunday, April 20, 2014

A Friendly Hello

I'm just dropping by to show off the sweet amigurumi bunnies I made for my niece and nephews and wish everyone a happy Easter!

Easter Amigurumi

In fact, I hope the entire spring season is treating you well!  May we all be surrounded by beauty and blessed with the ability to appreciate it.

Spring 2014

Spring 2014

Friday, April 18, 2014

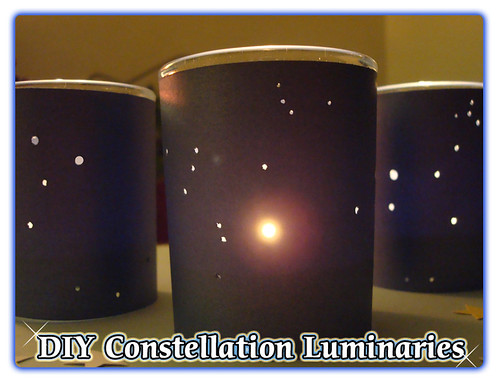
DIY Constellation Luminaries

After a frigid and stormy winter here in the Northern Hemisphere, many of us are ready for warm weather and long, sunny days.  To celebrate the coming spring and summer seasons, I dreamed up a tutorial for all my fellow stargazers out there in the world.  So if you're ready for fresh air, fireflies, cold drinks, bare feet, and mild evenings watching the stars sparkling in the sky, I've got a little something to help set the scene.  Keep reading to learn how to make your own constellation luminaries!
DIY Constellation Luminaries
One of the coolest things about this project is that it can be done with any constellation you choose.  For my test run, I created miniature, glowing replicas of the Aquarius, Scorpius, and Pegasus constellations.  You can do an image search on the web to find images of your favorite constellations, or you can use the perfectly-sized templates I've included below.

You will need:
★ Scissors
★ Printed images of constellations sized at 7” x 2.5”
★ Colored paper
★ Pencil
★ Pins
★ Awl or toothpick
★ Tape
★ Glass votive holder
★ Tealight candles

DIY Constellation Luminaries

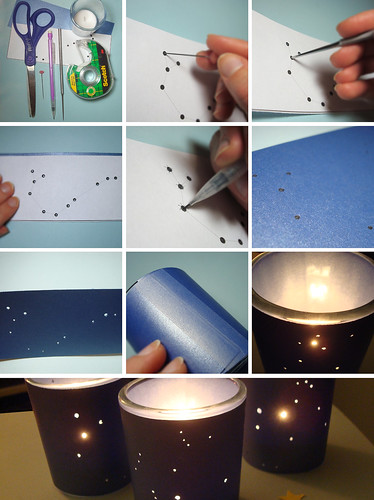
Instructions:
1. Gather supplies and cut paper to measure 7” x 2.5”. 
2. Use a pin to poke holes through the points of the constellation. 
3. Use an awl or toothpick to widen the holes made with the pin. 
4. Lay the constellation image on top of the colored paper. 
5. Use a pencil to fill in the points of the constellation. You may wish to create marks around the holes to keep track and make sure they’re all filled in. 
6. Check the colored paper to make sure all points of the constellation are marked and visible.
7. Repeat steps 2 and 3 on the colored paper to create holes for the light to shine through. 
8. Wrap the colored paper around the votive holder and secure the edges with tape. Trim any excess paper to create a clean edge around the top of the glass. 
9. Light a tealight candle and gently drop it into the luminary. 
10. Repeat this project to create luminaries for all your favorite constellations.

When I was designing this project, I had to do a bit of exploration to find images that were clear and properly sized.  I ended up creating my own templates in Photoshop and decided to share to make it easier for anyone else who might want to join the fun.  Just follow the links below for pre-designed, perfectly sized images to fit your luminaries.  You can either download the photos or send them straight to the printer without downloading (click next to the download button for the print option).  Make sure you set up the print job so that the image fills the whole page to ensure your printout is sized to fit a standard glass votive holder.
Constellation Printables
Click here to download a printable template featuring Pegasus, The Big Dipper, and The Little Dipper.
Constellation Printables
Click here to download a printable template featuring Hercules, Leo the Lion, and Orion.

Friday, March 21, 2014

Fitness Friday #16- The Burst: A Fun Cardio Workout to Increase the Afterburn Effect

Good afternoon, movers and shakers!  The purpose of today's Fitness Friday post is to share one of my absolute favorite workouts in my repertoire.  But before I give you the play-by-play of how to do it, I want to discuss a concept known as the afterburn effect. Without rambling on about the scientific masterpiece that is the human body, let's just summarize by saying that the afterburn effect describes the hours upon hours that your body continues to burn calories AFTER a workout.  This can work against you if you've ever overexerted your muscles and paid for it the next day by waking up to a stiff, sore body, but you can use it (comfortably!) to your advantage and I'm going to show you how.

Basically, the best way to keep your body working long after you've completed any exercise is to go as hard as you can.  This could mean running at an all-out sprint rather than a casual jog or completing a vigorous weight-lifting session.  But if that sounds exhausting and just reading about "giving it all you've got" makes you want to turn the other way, I get it.  I enjoy exercise, but I also enjoy comfort and I've never bought into the philosophy that you have to punish yourself to be fit.  I exercise for pleasure and for the health benefits, but I'm no athlete.  Luckily for folks like us, the afterburn effect can also be achieved by completing various workouts with high-intensity intervals spaced between less intense "rest" periods.

The Burst Workout

In my pursuit of a healthy weight and lifestyle over the years, this has become one of my favorite workouts for two reasons.  1) It's fun!  I often  find myself smiling when I'm doing the high-intensity portions of this workout because the bursts of running make me feel like a kid again.  2) It's fairly low-impact.  I'm no runner, so long-distance training is not my focus.  However, I find that when I run in short bursts with rests in between, it doesn't feel like a chore.  Are you ready?  Lace up your running shoes and let's move!

The Burst Workout

Minutes 0-2: Warm up by walking at 4 mph with your hands on the rails of the treadmill or resting at your sides.
Minutes 2-4: Power walk, still at 4 mph but with your arms pumping as if you were running.
Minute 4-5: RUN FOR IT!  Up your pace to 5 mph and run for a full 60 seconds.
Minute 5-6: Walk at 4 mph with arms resting.
Minutes 6-9: Power walk at 4 mph.
Minute 9-10: Run at 5 mph.
Minute 10-11: Walk at 4 mph with arms resting.
Minutes 11-14: Power walk at 4 mph.
Minute 14-15: Run at 5 mph.
Minute 15-16: Walk at 4 mph with arms resting.
Minutes 16-19: Power walk at 4 mph.
Minute 19-20: Run at 5 mph.
Minute 20-21: Walk at 4 mph with arms resting.
Minutes 21-24: Power walk at 4 mph.
Minute 24-25: Run at 5 mph.
Minute 25-26: Walk at 4 mph with arms resting.
Minutes 26-29: Power walk at 4 mph.
Minute 29-30: This the the grand finale!  Sprint at 5.5 mph (or as fast as you can go) for a full 60 seconds.
DONE!  You crossed the finish line, and the crowd is going wild.  You are a superstar!

It may seem very involved when I list every step minute-by-minute, but you will notice a pattern after the first 10 minutes and it will all come very naturally.  For example, at the end of each running burst you will instinctively want to rest your arms at your sides, walk for a spell, and cool off a bit.  I also make sure to drink plenty of water throughout the workout, and the resting minutes are a great time to go for a refreshing guzzle of cool water.   

This exercise is most easily completed on a treadmill so you can track your time and pace (I unfold my treadmill in the living room and watch movies while I work out, a routine a highly recommend because it makes the time pass quickly), but if you don't have access to a treadmill you can also do this exercise in the great outdoors with a little help from a stopwatch, pedometer, or an app on your phone to help you keep up with the time and speed.  The greatest thing about this afterburn workout and that you don't actually feel it after the fact.  You can go about your day while your body remains hard at work burning excess calories and fat.  I also find it very energizing and refreshing, so I typically feel an elevated mood setting in right after I finish.  The next time you feel up to it, set aside a half hour to bring a burst of sunshine into your day.

Have a happy weekend!

Thursday, February 27, 2014

Crochet Leg Warmers + A Video Highlighting Tulsa's Fiber Artists

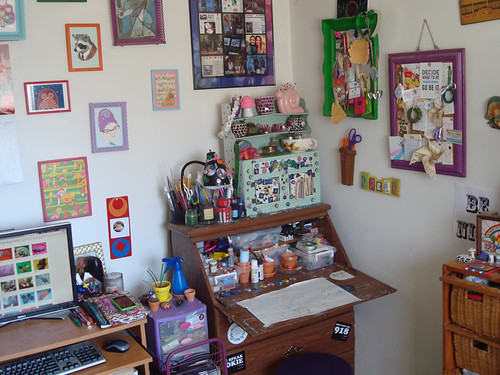
If you've ever poured yourself into any form of creativity, you might relate to something I've often encountered: Variety keeps it interesting.  Actually, I would apply this theory to lots of things, even beyond the artistic world.  It's easy to get burned out on your job, your town, your daily routine, or any aspect of life if you don't try something fun and different occasionally.  So when it comes to crafting, crochet is my escape.  My little craft desk is one of my favorite places in the world.  Nothing but good vibes are allowed in this corner.  Just ask my husband how quickly he gets shut down when he tries to talk politics when the music is playing and the work surface is open for business.  It's a very safe, happy place for me.

Craft Corner

That being said, sometimes I need to escape.  I spend a LOT of time in this corner, not only creating things but also photographing and packaging them.  So occasionally, I start feeling trapped in this space and I have to break away for a change.  That's where crochet comes in.  This medium is very mobile.  I can take it to the most comfortable spots of my home, to a coffee shop to work in the company of friends, or to a sunny park bench with a soundtrack of birds chirping and leaves rustling.   I was so pleased with a recent crochet creation that I wanted to share in case anyone else might be interested in bustin' out the crochet hooks and making some too. 

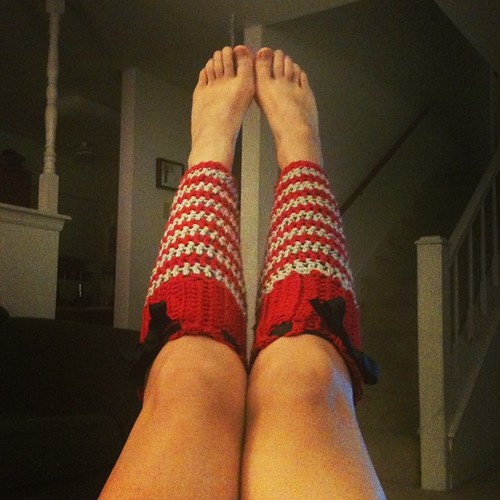
Crochet Leg Warmers

These fun leg warmers were based on a pattern I found here for only 21 cents.  I wanted mine to be tapered to fit my leg, so I altered the pattern by doing a double crochet decrease halfway around rows 5, 7, 9, 11, and 13.  I also wove a black ribbon through the top of the cuffs to keep them in place during wear and to add a little extra flair.  I was pleased with the results, but unsure of where I might be able to sport these new cuties other than around the house.  Luckily, I found the perfect venue.  I recently started taking belly dance classes (keeping with the theme of variety, I guess I was just craving something new and exciting) so I wore my new leg warmers to dance class and shimmied the day away.

Crochet Leg Warmers

If you'd like to see a few shots of these leg warmers in progress, check out this segment that was featured on the local news last week.  The lovely and entertaining MC Swab of Fly The Coop interviewed knitters and crocheters at Loops, a yarn store we all adore.  Not only can you see friendly faces working on various projects and discussing the merits of fibercrafts, there's also a brief conversation about how much my Gran inspired me to start crocheting.  I hope somewhere out there, her soul did a happy dance when her photo was aired on the local news.  


So now that you know about my creative escape, tell me about yours!  What do you do to recharge your crafty energy?

Friday, February 21, 2014

Glow For A Walk

As you may have gathered in my Gypsy Update, I have fallen in love with being a dog owner.  Like I mentioned in that post, I find it very enjoyable to wander around the city with my pup by my side.  Over the summer, we often wait until the sun goes down to walk her so she doesn't overheat.  Of course brightly colored clothing is just part of my lifestyle, whether I'm walking at night or not, but sometimes even that doesn't seem like enough.  So I recently created a set of accessories that will help keep me and my dog safe during our evening walks.

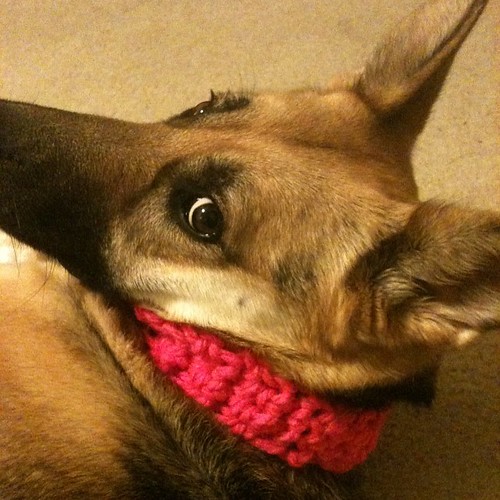
My friend Sherri, who works at a wonderful local yarn store called Loops, introduced me to a very cool product that I just had to try out.  Lumio yarn is unique because not only is it available in lots of fun colors, it also has reflective threads woven in.  I am not referring to a little bit of weak sparkle or a shimmery strand or two, instead this yarn contains actual reflective fibers that shine like stars.  So I crocheted a comfy slip-on collar for Gypsy, who reacted by giving me lots of puppy-dog eyes because I think she already suspected this collar was intended for walking and she was more than ready to try it out.

Reflective Dog Collar for Evening Walks
Dude.  Put down the camera and walk me already, crazy lady!

But before we headed out, I needed to make some matching wrist cuffs for myself because I am officially one of those people who dresses to match their dog.  We also had matching grins as we paraded down the street that night in our new gear.

Reflective Dog Collar for Evening Walks

Since I was so pleased with the prototype I made for my own purposes, I decided to go ahead and offer them for sale in my Etsy shop.  Because, surely, I'm not the only one who enjoys nighttime walks with my dog and wishes to keep her safe and visible.

Reflective Dog Collar for Evening Walks

I acquired all the most bright, festive colors available in this yarn and got to work creating patterns to accommodate dogs of all sizes.  I have many colors all stitched up and ready to ship in small, medium, and large, or you can choose custom sizing and include your dog's measurements for a perfect fit!

Reflective Dog Collar for Evening Walks

With this new creation, we've been getting in so many good walks that I've noticed more naps taking place too.  Some of them even involve *almost* snuggling with one of the cats.  We're one step closer to my seemingly unrealistic daydream of someday seeing an interspecies cuddle session in full force.

Isis and Gypsy

Thanks for taking the time to read about yet another silly little craft accomplishment that I'm way too excited about!  Have a colorful day!

Monday, February 10, 2014

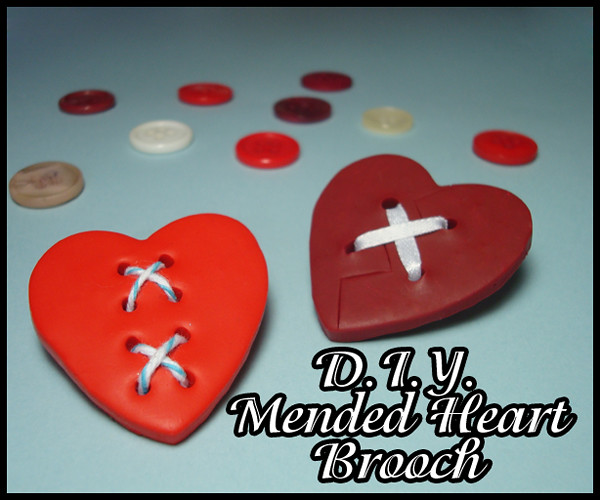
Mended Heart Brooch Tutorial

If you've ever had your heart broken by life's ups and downs, you know how important it is to find ways to heal yourself.  This world is full of tragedy and hope, sadness and sunshine.  Since Valentine's Day is this week and many people find themselves reflecting on the nature of love and relationships, I've noticed this holiday invokes many passions.  Some feel complete rage when faced with the capitalistic rush to buy gifts, while others anticipate a romantic evening spent with a new love or perhaps plot that first move toward someone they have feelings for.  It can go both ways, but like many other issues, I like to keep a sweet little spot for myself somewhere in the middle.  Here's what I mean...

To celebrate Valentine's Day each year, I simply remind myself to be extra thankful for every single arrow I've ever been shot with, romantic or not.  I was struck violently by cupid's arrow when I first became an aunt and have been smitten with this role ever since.  I have "fallen for" new friends, people who have entered my life over the past few years and made it better than it was before.  Rather than completely rejecting this holiday when the concept of love is paraded in my face for a month straight leading up to Valentine's Day, I like to reassert my mission to fall in love with the world around me over and over again.

Mended Heart Brooch Tutorial

This project is intended to celebrate those with big hearts, as well as the courage of the human spirit and our ability to patch up our wounds and keep on loving.  So grab these supplies and let's cure it with crafts!

Mended Heart Brooch Tutorial

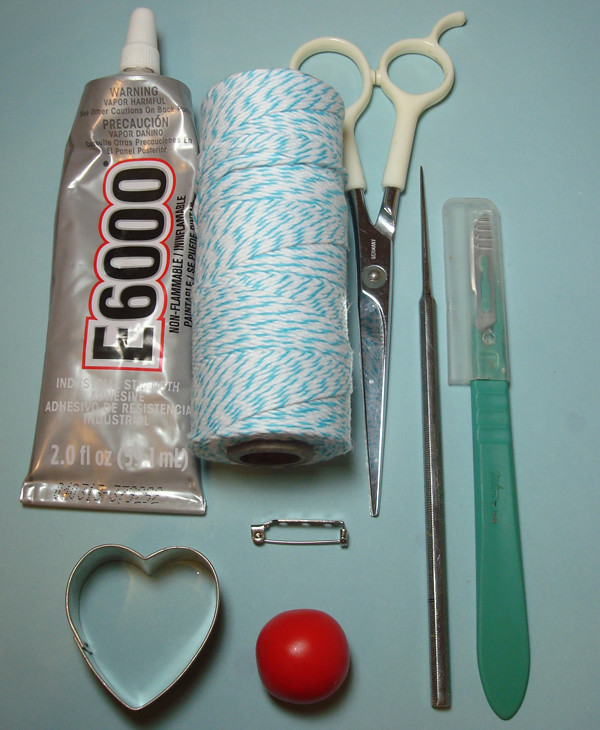
You Will Need:

♥ E6000 glue
♥ Twine, ribbon, or thread
♥ Scissors
♥ A needle, toothpick, or sharp object for piercing clay
♥ A knife or blade (optional, used for adding "broken" heart details)
♥ A pinback
♥ Polymer clay in your choice of brand and color (I used Premo in red)
♥ A miniature heart cookie cutter (can be purchased in the baking section of craft supply stores for under a dollar, or you can sculpt a heart from the clay by hand if you don't want to use a cutter).

Instructions:

Step 1: Prepare a clean work surface.  I like to use a tile or a sheet of wax paper taped to my craft desk.  Roll a large chunk of clay into a ball (1/4 of the package should be plenty).
Mended Heart Brooch Tutorial

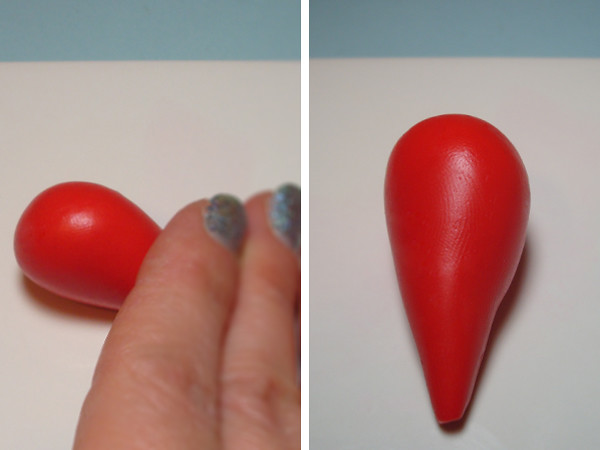
Step 2: Roll the clay on one side with your hand slanted to create a teardrop shape.
Mended Heart Brooch Tutorial

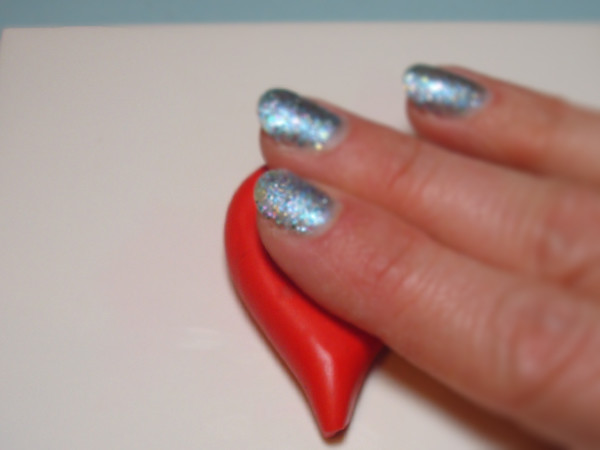
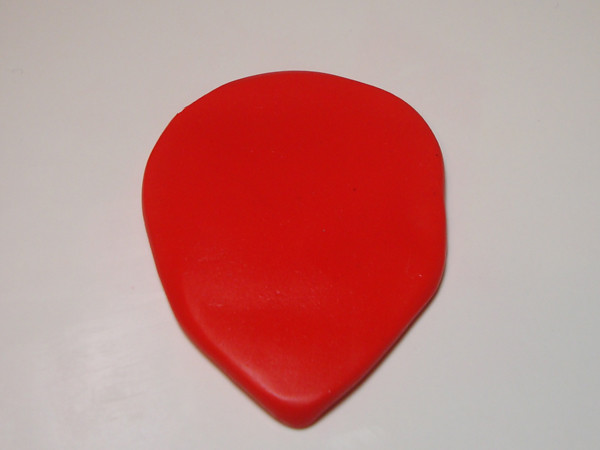
Step 3: Press the teardrop flat with your fingertips.
Mended Heart Brooch Tutorial

Step 4: Continue pressing the clay until the teardrop is flat and spread out enough to accommodate your cookie cutter.  You can use a rolling pin or round object to do this or your fingertips.  If you use your fingers, gently wipe at the surface of the clay when you're finished to remove fingerprints.
Mended Heart Brooch Tutorial

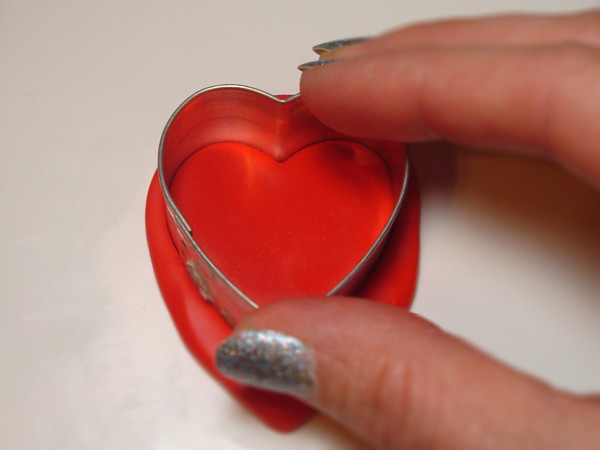
Step 5: Press the cookie cutter onto the clay and cut a heart shape.
Mended Heart Brooch Tutorial

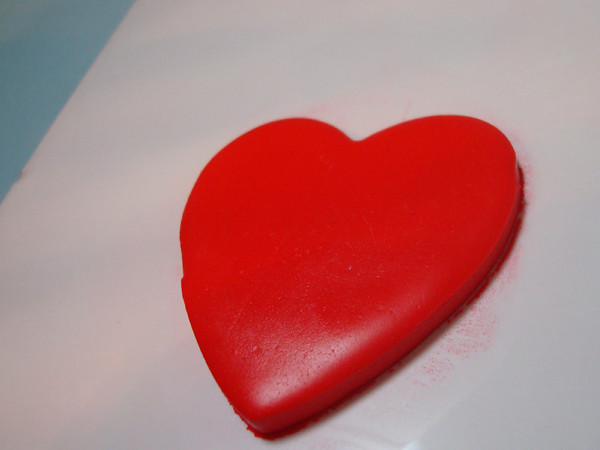
Step 6: Remove the cookie cutter and the excess clay around the edges of the heart.
Mended Heart Brooch Tutorial

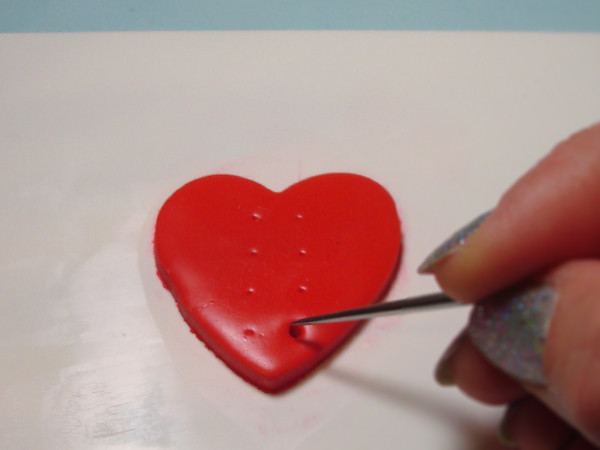
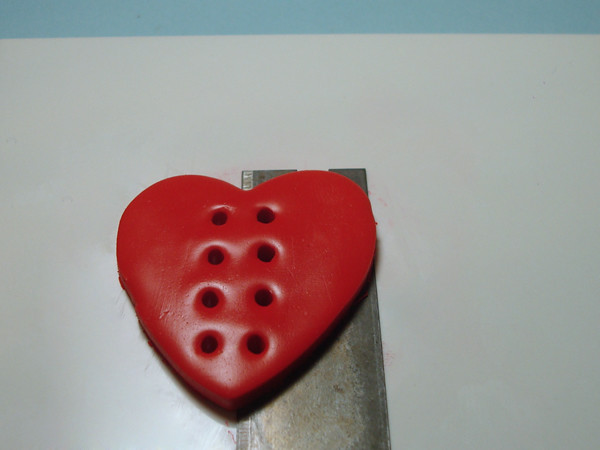
Step 7: Use a pointed tool to plan and penetrate holes in the heart shape.  Make sure the holes are large enough to allow your string to easily pass through.
Mended Heart Brooch Tutorial

Step 8: Continue until you've made all the punctures you need in your heart.  I made two hearts, and placed 8 holes on one and 4 on the other.  Feel free to get creative with the placement!  Just try to keep in mind that you'll be lacing your string through it later on and try to plan a pattern you like.
Mended Heart Brooch Tutorial

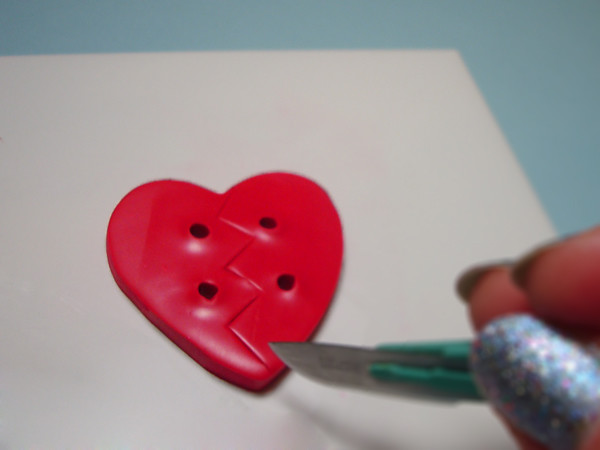
Step 9: If you'd like to create further details, use a knife to leave a "hearbreak" impression in the center of your shape.
Mended Heart Brooch Tutorial

Step 10: Carefully remove the heart from your work surface.  You may wish to use a knife or blade to lift it without distorting the shape.
Mended Heart Brooch Tutorial

Step 11: Bake according to the directions on the package of clay you used.  Allow to cool completely.
Mended Heart Brooch Tutorial

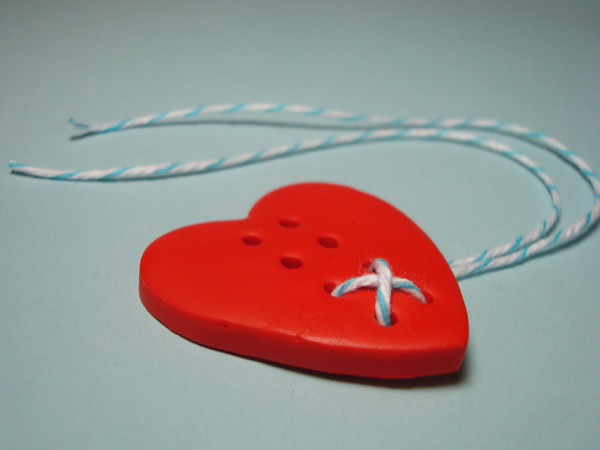
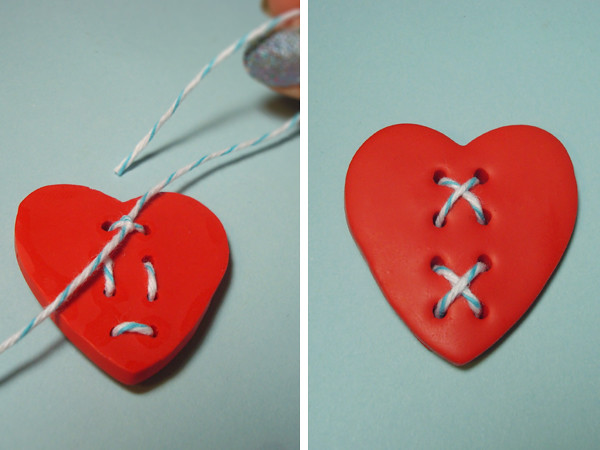
Step 12: Cut a length of string and begin threading it through the spaces on the cured heart.
Mended Heart Brooch Tutorial

Step 13: Once you've threaded the string to create a pattern you like, tie a double knot on the back of the heart and trim the ends.
Mended Heart Brooch Tutorial

Step 14: Glue the pin to the back of the heart with E6000.  Add a drop of glue to the knot as well to keep it secure.  Allow the glue to dry for 12-24 hours.
Mended Heart Brooch Tutorial

Step 15: Use your new mended heart brooch to adorn your sweater, purse, or backpack.
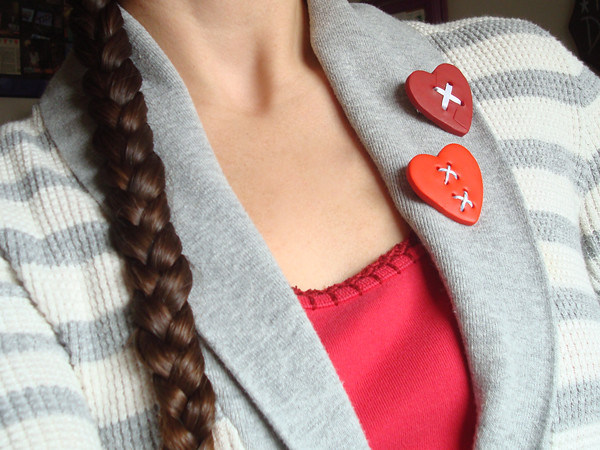
Mended Heart Brooch Tutorial

I like to stretch my tutorials out to show detailed photos of each step, but here's a little collage that puts it all together for a start-to-finish view of this project.  Click the photo to zoom.
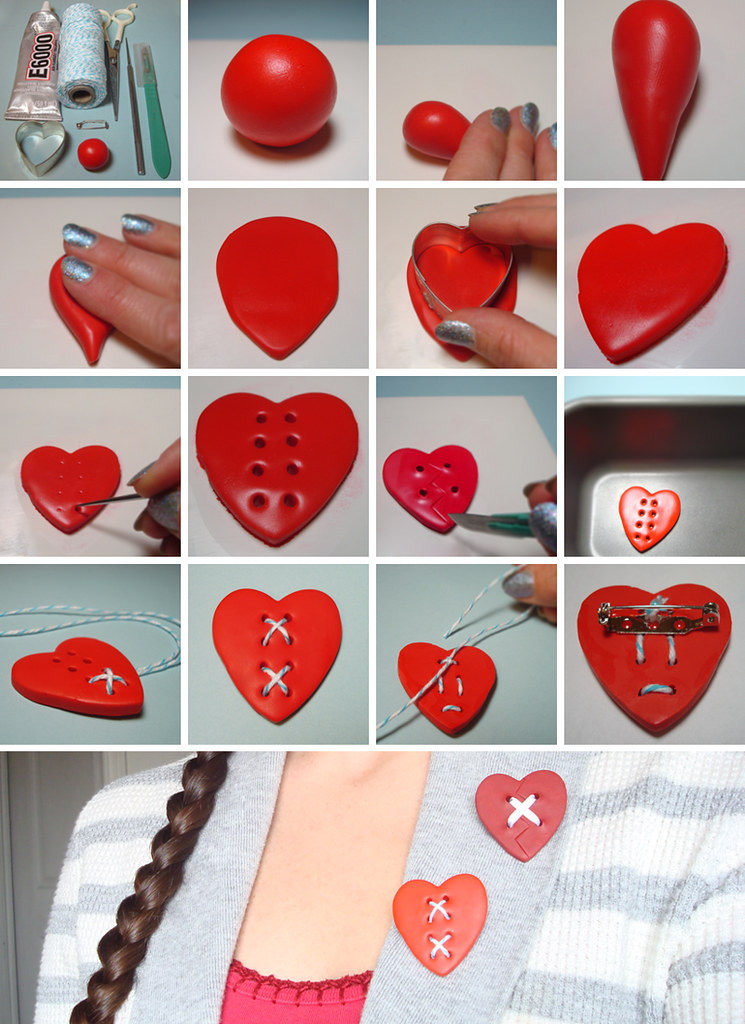
Mended Heart Tutorial

I hope you have a magical week filled with as much love as your precious heart can possibly hold!